To print a page, simply click the print button above. To ensure accuracy, it is highly recommended that you use Microsoft Internet Explorer 5 (or higher) or Netscape Navigator 6 (or higher) to view and print this User Guide.
Adding a New Menu Layer
Once you have added a new menu button image you can add the new menu flyout layer that corresponds to your new menu button. This exercise will walk you through the process of adding a new menu flyout menu layer and then adding the behaviors to make it all work. This step will assume that you have already added the new menu button as outlined in Adding a New Menu Button. If you have not already done so, please complete that step before attempting to complete this section because the behavior events will require that the new menu button has been created. For this exercise we will assume that you have created the "Hall of Fame" button, named "trig7".
Adding a new menu flyout layer is a 7 Step process:
- Insert a new menu layer using the Jazz Objects Command.
- Add a Snap behavior to the new menu trigger button.
- Add a AutoLayer behavior to the new menu trigger button.
- Add a MultiClass behavior to the new menu trigger button.
- Modify the MultiClass behaviors on all other menu buttons.
- Modify the N4 autoHide behavior on the BODY, onLoad event to add the new layer name to the behavior.
- Modify the Snap behavior on the BODY, onResize event to add the new menu layer name to the behavior.
1. Insert a new menu flyout layer
We have taken the pain out of creating a new menu flyout layer. To assure that each of the menu flyout layers are consistent in design, we are going to use the Jazz Objects Command to create the new layer. It will quickly add a new menu flyout layer to your page already pre-formatted with boilerplate text and links... ready-to-go!
Open the index.dwt page located in the Templates folder.
Scroll to the bottom of the page. You will see six yellow "C" icons and then a space. These are the menu flyout layer icons and are part of the "locked region" of the Template.
Position your cursor just to the right of the 6th icon and click to set the insertion point for the new layer. Be sure that you do not place the cursor in the "editable region" named "thelayers".

Choose Insert - P7 DesignPacks - Jazz Objects.
Set the Select an Object box to: Jazz menu Flyout Table
Set the pixel width of the new layer. In this example, we will use the same width as the other menu flyout layers: 200

Click the Browse button and navigate to the ../assets/images folder.
Click the shim.gif image and then click Select button. This is the image that the command will use as a spacer to form the tables properly.
Click the OK button to create the new menu flyout layer. The new layer will appear on the page, fully styled and Jazz formatted. The name of the layer will be automatically assigned, in this example, the name is "flym7".
The z-index of the layer been preset to 9, which will place it above the other existing menu layers. It is not necessary to change this since none of the menu layers will ever show at the same time. We just want to be sure that the z-index of the menu flyout layer is higher than any of the non-menu layers on the page.
The visibility of the new menu flyout layer has been set to "default", keeping it visible in the Dreamweaver window. This makes for easier editing while you are setting the content of this new layer. Remember to set the visibility to "hidden" once you have finished your editing.
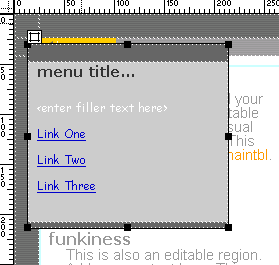
As you can see, the new menu flyout layer looks just like the existing menu flyout layers. It will pick up all of your style settings automatically.
Now that the layer has been created you can go ahead and modify the content to suit your needs. For this example, we'll jump right into the next section to add the behaviors to integrate the new menu flyout layer into the menu system.
2. Add a Snap behavior to the new menu trigger button
We will add a Snap Layer behavior to properly position the new menu layer next to the new button image in the menu.
Click on the new menu button, the "Hall of Fame" button you added in the "Adding a New Menu Button" section.
Click the plus button (+) on the Behaviors Panel.
Choose Studio VII - Snap Layers by PVII to open the Snap interface.
Select "trig7" as the Anchor Object. This is the id name given to the image button that you created earlier. Use the actual id name of the image button that you created.
Select layer "flym7" as the Layer to Snap. This is the name of the layer we added in Step 1 above, use the actual name of the layer your created.

Enter -200 in the Offset Left box. This will position the layer 200 pixels to the left of the button image. Since the width of the layer is 200 px, this will align the right edge of the layer with the left edge of the image. Use the actual width of the layer that you created.
Enter 6 in the Offset Top box. This will position the layer 6 pixels down form the top edge of the image. We want to use this offset so that the top band of color on the layer aligns perfectly with the rollover color in the button.
Click OK to apply the behavior.
In the Behaviors Panel, click on the line that contains the Snap Layers behavior, then click on the down arrow of the Events column.
Select (onMouseOver) from the events listing. The brackets () indicate that the event is being applied to the <a> tag and not the image itself. Be certain that you have used the (onMouseOver) with brackets. If you do not find the (onMouseOver) event listed, be sure that the "Show Events for" flyout has "4.0 and later browsers" checked.
3. Add a AutoLayer behavior to the new menu trigger button.
We will add a AutoLayer behavior to make this layer visible when the user mouses over the new menu button. This will also automatically hide any of the other menu layers as well.
Click on the new menu button, the "Hall of Fame" button you added in the "Adding a New Menu Button" section.
Click the plus button (+) on the Behaviors Panel.
Choose Studio VII - Auto Layers by PVII to open the Auto Layers interface.
Click on the line that references layer "flym7". This is the name of the new menu flyout layer we added.
Click the "Show Layer" button.
Important: Be sure that the Set to Use box is set to: Set One. This is the layer set that we are using only for the menu flyout layers. Other layers on the page that use AutoLayers are set to use a different layer set.

Click OK to apply the behavior.
Set this behavior's event to: (onMouseOver) in the Behaviors Panel.
4. Add a MultiClass behavior to the new menu trigger button.
We will now add a MultiClass event to change the class of the <td> that contains the menu button image to the "menucellover" class. This will provide the rollover color.
Click on the new menu button, the "Hall of Fame" button you added in the "Adding a New Menu Button" section.
Click the plus button (+) on the Behaviors Panel.
Choose Studio VII - MultiClass by PVII to open the MultiClass interface.
Select "mhead" in the Select Object listing.
Select "menucellover" in the Select Style listing. This will set the "menucellover" class to the "mhead" object. The "mhead" object is the <td> that contains the main Jazz image, and setting this to menucellover class will change the color of the little square above the saxophone image.
Next we will add a number of events that will set all of the other menu button <td> classes to the "menucelloff" class:
1. Click the plus button (+) at the top of the MultiClass window to add a new event.
2. Select "mb1" in the Select Object listing.
3. Select "menucelloff" in the Select Style listing.
Repeat these 3 steps for each of the remaining original menu buttons:
- mb2 (menucelloff)
- mb3(menucelloff)
- mb4(menucelloff)
- mb5(menucelloff)
- mb6(menucelloff)
Now we will add the event to set our new menu button <td> to the "menucellover" class.
Click the plus button (+) at the top of the MultiClass window to add a new event.
Select "mb7" in the Select Object listing. This is the id name of the newly added <td> tag that contains the newly added menu button.
Select "menucellover" in the Select Style listing.
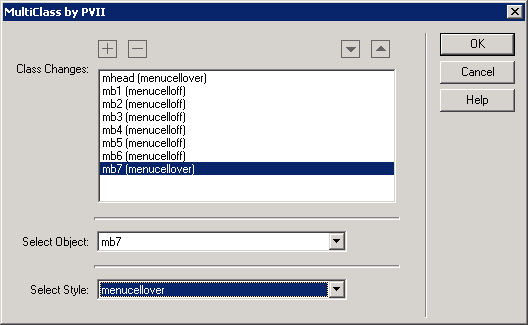
Click OK to apply the behavior.
Set this behavior's event to: (onMouseOver) in the Behaviors Panel.
The Behavior Panel should now look like this:

Next we will modify a few of the existing behaviors to include a reference to our newly created layer and the <td> tag of its associated menu button image.
5. Modify the MultiClass behaviors on all other menu buttons.
Click on the Jazz image at the top of the menu.
On the Behaviors Panel, double-click the MultiClass behavior to open the interface.
Click the plus button (+) at the top of the MultiClass window to add a new event.
Select "mb7" in the Select Object listing. This is the id name of the newly added <td> tag that contains the newly added menu button.
Select "menucelloff" in the Select Style listing. This will set the background color to the "menucelloff" class.

Click OK to apply the behavior.
Repeat this process to add the "mb7(menucelloff)" event to each of the MultiClass events on the remaining original menu button images: the Artists, Festivals, Reviews, Interviews, Genre and Information images.
6. Modify the N4 autoHide behavior on the BODY, onLoad event to add the new layer name to the behavior.
The N4 autoHide event is fired onLoad to allow Netscape4 to properly hide the menu flyout layers. We will add the name of our new menu flyout layer, "flym7", to this behavior.
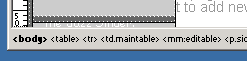
Select the <body> tag at the bottom left of the main window.
Open the Behaviors Panel and double-click the N4 autoHide by PVII behavior to open the interface.
Select the line that references layer "flym7" and click the "AutoHide" button to set this layer as "Selected".
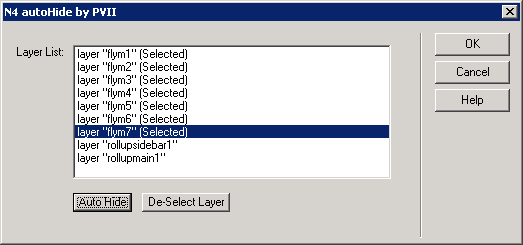
Click OK to apply the behavior.
7. Modify the Snap behavior on the BODY, onResize event to add the new menu layer name to the behavior.
We placed a Snap behavior on the Body, onResize event that is designed to place all of the menu layers to the top-left of the page when the browser window is resized (this avoids spawning scrollbars). We will modify this event to add the new menu flyout layer.
Select the body tag at the bottom left of the main window.
Open the Behaviors Panel and double-click the Snap Layers by PVII behavior to open the interface.
Click the plus button (+) at the top of the Snap Layers window to add a new event. A new line appears with the same anchor object and offsets as the previous line.
Select layer "flym7" as the Layer to Snap. This is the name of the layer we added in Step 1 above, use the actual name of the layer your created. There is no need to change anything else on this line.

Click OK to apply the behavior.
One more step and we're done! Remember that we set the visibility of the new menu flyout layer to "default". Now that we are finished working with the layer we will set the visibility to "hidden". This assures that the layer is not visible when the page first loads.
Locate the new menu flyout layer, "flym7", in the Layers Panel. The first column, the "Eyecon" column, controls the visibility settings for the layers.
Click the first column on the "flym7" line to show a closed "eyecon".

That's it! The new menu flyout layer, and all of the script references to it, are now set up and functional. Preview the template page to be sure that the menu is functioning properly and all of the related events are working. You can save the template page now to update the rest of the pages in the site.
Note: After adding an image with events on the <a> tag, like this new menu button, you may want to apply our IE Link Scrubber to hide those "outlines" in IE4+ browsers.