To print a page, simply click the print button above. To ensure accuracy, it is highly recommended that you use Microsoft Internet Explorer 5 (or higher) or Netscape Navigator 6 (or higher) to view and print this User Guide.
Note: The methods described and screen captures used are based on Dreamweaver 4. If your version is different, please log on to our support newsgroup for quick assistance.
cascading style sheets
Editing Styles (in Dreamweaver 4)
Dreamweaver 4 makes editing style sheets a snap. However, there are a few rules of wisdom we'd like to impart before we dive in!
PVII CSS Rules of Wisdom
Follow these rules no matter what you may read elsewhere.
They are your friends :-)
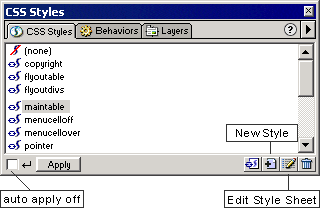
- Always uncheck the Auto Apply box. If you select a style in the CSS Styles Panel (depicted above) and the auto Apply box is checked, the style will be applied to the tag closest to where your cursor happens to be on the page. Perhaps Dreamweaver will fix this in the next version, but for now we urge you to uncheck the box!
- Always use the context menus to apply custom styles. To apply a custom style to a tag, select the tag marker on the Dreamweaver status bar, right click (ctrl-click) and choose Set Class. To apply a custom style to a block of selected text... select the text and right-click (ctrl-click). Choose CSS Styles and select your style.

Choose a tag on the status bar and right-click (Ctrl-Click)
to apply a custom style
Opening the CSS Editor to Edit a Style
The 2 quickest ways to open the Style Editor are:
- Click the Pencil Icon on the bottom of the CSS Styles panel
- Right-Click (Ctrl-click) anywhere on the page and choose CSS Styles | Edit Style Sheet
Either method will pop up the Edit Style Sheet window:
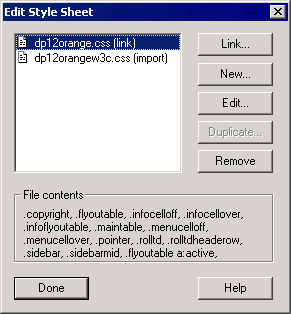
The Edit Style Sheet window lists the linked and/or imported Style Sheets attached to your document plus any styles embedded directly in the document's <head> between valid style tags. If you select one of the Style Sheet files (as we did), you will wind up with 4 active command buttons:
- Link: Use to attach an external Style Sheet to your page through either the Link or the Import method.
- New: Create a new style.
- Edit: Open the Styles list from which you can select an existing style to modify.
- Remove: Delete the selected style sheet from your page.
Select dp12orange.css and click the Edit button. The Style List window will open:
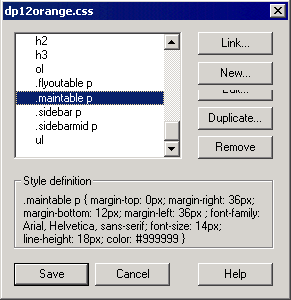
A list of all valid styles in the dp12orange.css file will appear in a scrolling box.
Scroll down the list of styles and select .maintable p
Click the Edit button
The Style Definition window will open:
The Style Definition window is comprised of Categories. Selecting a Category changes the available settings in the main part of the window contextually.
The Type Category
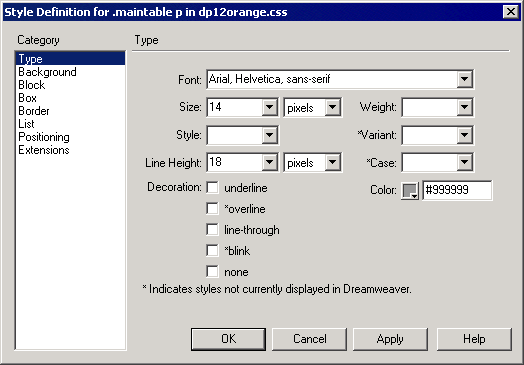
The Type Category is the first one you see and this is where you set the main typestyle definitions. The available settings are:
- Font: Dreamweaver includes several cross-platform font families. Our style is using the Arial, Helvetica, sans-serif family. That means users will see the type in Arial. If Arial is not available on their system, the browser will look for Helvetica, and if that's not found the default sans-serif font will be used. Sans-serif means the font is comprised of straight lines. Arial is found on all Windows and some Macintosh systems. Helvetica is found on all Macs. A sans-serif font would be available if the user has an uncommon computer system or has somehow deleted some of his standard fonts.
- Size: The only size parameters that should be used are:
- Pixels- The most consistent cross-platform measurement
(Note: Many modern browsers allow the user to easily override your settings). - Percentage- All things relative! The baseline of 100% is contingent upon your visitor's browser settings. So, if you make your main type size 90% it will be 10% smaller than the current browser setting. Headings, for instance, would typicaly be set higher than 100%.
- Nothing- The setting that leaves it all to the browser. This is a good choice for simple text documents that need to be printed on older browsers.
- Pixels- The most consistent cross-platform measurement
- Style: Your choices are normal, italic or oblique. We usually leave this blank since both italic and oblique (slanted) look horrible on the web. Normal is default and does not need to be declared unless the parent element is italic or oblique.
- Line Height: Use the same measure as your text size. As an example, 14 pixel text and 28 pixel line-height is like choosing double-spaced on an old typwriter. Line-height should never be applied to a <table>, <tr>, or <td> style as that will cause problems in Netscape 4. Applied to a block element like a <p> works just fine. Used wisely, line-height makes text easier to read.
- Decoration: These are generally reserved for hyperlink <a> styles. Blink is a Netscape 4 proprietary style and is considered gauche by most web design professionals.
- Weight: The obvious choices are Normal and Bold. Modern browsers allow for fine-tuned settings. At this time, only Netscape 6 and MSIE 5-Mac support settings other than Bold or Normal.
- Variant: You can choose Normal or Smallcaps. We just say no thank you and move on :-)
- Case: This is something we hardly ever use. Modern browsers can present your text in a case other than how you typed it. All lowercase, all uppercase, or capitalized (first letter of each word).
- Color: Dreamweaver's palette allows you to pick any color in the rainbow for your type... or you can enter the color in any CSS supported format (for advanced users only!) including, hex code, RGB, and CSS named colors. f you are not an advanced CSS user, we suggest using the color palette!
The Background Category
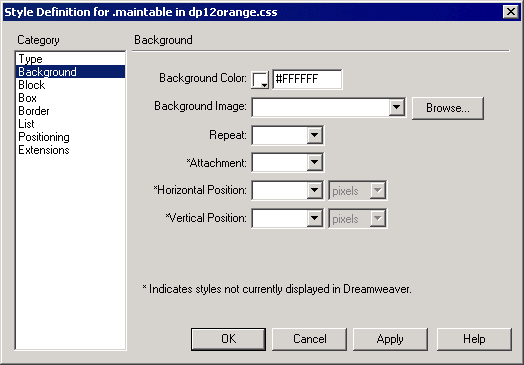
The available background settings are:
- Background Color: Enter a color code or use the flyout palette.
- Background Image: Use the browse button to browse to and select a valid
image. If the file location is outside your defined site, Dreamweaver will prompt
you to save a copy within your defined site. The background CSS property can be
used for any element, but is best supported when used in concert with the <body>
tag (for your page background image), with a <table> tag, or with a <td>
tag. Netscape 4 often times has problems with CSS background images unless the
image path is absolute. For example:
http://www.mydomain.com/images/bgimage.gif.
When using a background image you should always set a background color that is close to the dominant color in the image. Your browser will display the background color until the background image has fully loaded. - Repeat: Background images can be set to behave in interesting and creative
ways. Here are the choices:
- no-repeat- The image will be placed in the top left corner of the browser as if you inserted it. However, it will behave like a background image in that all of your content will appear on top of it.
- repeat- This is the conventional and default behavior in which a background image is tiled equally along the x and y axes of the browser window, filling all available height and width.
- repeat-x- The best way to describe this setting is to imagine a 1-inch black square in the left top corner of your window that repeats from left to right. The result is a 1-inch high black band that stretches the entire width of the browser.
- repeat-y- Imagine our same black square. This time it repeats from top to bottom... creating a 1-inch wide band on the left side of your window that extends vertically to fill all available height.
- Attachment: There are 2 choices here:
- Fixed- This creates a watermark effect in supporting browsers (MSIE5+, NN6, Opera5) where tha background image remains fixed while the page content scrolls. This can be combined with Repeat settings to create interesting effects.
- Scroll- This is the browser default and behaves as you would expect. That is, the background and the page scroll in unison. You need only declare this if there is a fixed property on a parent element. Otherwise, leave it blank.
- Horizontal Position: This property can be used to set the position of a non-repeating image or even to set the starting point of a tiling image, relative to the top of the page. Settings can be in logical units of measure (pixels, e.g.) or explicit (Left, Center, Right). Very cool effects are achievable, except that Netscape 4 and MSIE4 will pretty much ignore you. So, for the immediate future, do not use this setting for anything critical to your design!
- Vertical Position: Works the same as Horizontal positioning except that the explicit settings would be Top, Center, Bottom.
The Block Category

The available Block settings are:
- Word Spacing: Sets the space between words. Use positive values to increase space and negative values to decrease space. Hint: I don't think I've ever used this definition. I have seen it used to quite ugly effect on www.fatbrain.com!
- Letter Spacing: Sets the space between characters in a word. Use positive values to increase space and negative values to decrease space. This can yield quite attractive results if used prudently and with headings especially.
- Vertical Alignment: Sets the vertical position relative to the parent element. The footnote markers on the CSS Overview page use a style with Vertical Alignment set to super, which raises the text above the surrounding text.
- Text Align: Left or right is cool depending on your design. We tend to stay away from justified because it can sometimes produce undesirable results in Netscape 4.
- Text Indent: Indents the first line of text in the applied element.
- Whitespace: Another rare one. The default for all browsers is none
and causes all space in the source code to collapse. Setting it to Pre
allows you to preserve unusual spacing characteristics based on manually entered
source code. Imagine the content inside a pair of <p> tags inside your source
code looked like: <p>This is some funky
spacing</p>. Using Pre would preserve that formatting. However,
not very many browsers support this and the same result can be had by using the
Preformatted setting in the Format dropdown on your property inspector.
There is also a NoWrap option which works the same as the NoWrap setting for table
cells. That is, your text will run on a single line until it encounters a soft
<br> or hard <p> break. If you want to use pre in your style sheet,
you must declare a W3C DTD. DTDs go at the very top of your document above the
opening <html> tag. Here is an example of a DTD to use:
<!DOCTYPE HTML PUBLIC "-//W3C//DTD HTML 4.0 Transitional//EN" "http://www.w3.org/TR/REC-html40/loose.dtd">
The Box Category

The available Box settings are:
- Width: Sets the width of any block element (it can be used to set table properties but Netscape 4 might take exception to this technique). Very cool design layouts can be made by combining margin and width settings to stagger entire paragraphs.
- Height: Sets the height of any block element. The same concepts discussed above for Width apply to Height.
- Padding: Sets the space between an element's border and its contents. You can set one side or all four. CSS Padding is not well-supported by Netscape 4.
- Float: Positions an element to the left or right of the content flow on a page. The other content then wraps around the floated element. CSS Float is not very consistent across browsers. Netscpae 6, MSIE 5-Mac, and MSIE 6 have the best support. We don't recommend using this style property unless you are targeting a single-browser intranet.
- Clear: Causes the element before the floated element to be pushed down below the floated element instead of wrapping around it.
- Margin: Set Top, Right, Bottom, Left, or any combination thereof. Margins are pretty safe to use in all version 4 and higher browsers.
A note about margins and lists: Netscape 4 will display a bullet offset higher than the text if margins are applied to list items. We avoid this blemish by using the @import trick explained later in our CSS documentation.
The Border Category
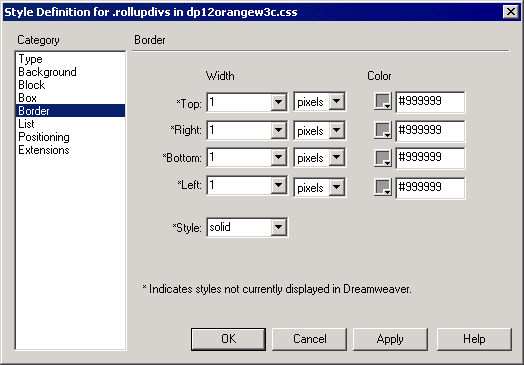
The available Border settings are:
- Width: Sets the width of the Top, Right, Bottom, and Left border. You can set some or all. Set any side that you do not wish to have a border to 0.
- Color: Set the color for the corresponding border side. Each border can be a unique color.
- Style: Choose from:
- None
- Dotted
- Dashed
- Solid
- Double
- Groove
- Ridge
- Inset
- Outset
Netscape 4 has problems with all but Solid and None.
The List Category

The available List settings are:
- Type: Choose from..
- Disc: An open circle
- Circle: A filled circle
- Square: A filled square
- Decimal: Numbers 1. 2. 3. followed by decimals
- Lower-Roman: i ii iii iv v
- Upper-Roman: I I III IV V
- Lower Alpha: a. b. c. d. e.
- Upper Alpha: A. B. C. D. E.
- None: No bullet rendered.
- Bullet Image: Replaces html bullets with an image of your choice. It's a good idea to make the image approximately 12px by 12px or it will look out of place. Netscape 4 will ignore this setting and display an ordinary bullet.
- Position: Choose from...
- Inside: Displays the bullet flush left with the text and indents the first line.
- Outside: The default style for all browsers places the bullet to the left of the text, which is flush left.
The Positioning Category
The positioning category is beyond the scope of this Design Pack. Furthermore, Dreamweaver 4 has some anomolies with how it handles styles on layers which cause problems when declaring layer styles in a CSS file, if you later drag or resize the layer in the Dreamweaver window. We will cover CSS positioning properties on a need-to-know basis until Dreamweaver updates its support for CSS-P in new versions.
The Extensions Category
Extensions, at this point in time, cover proprietary MSIE features. Netscape may support some similar features in updates to its version 6 browser, but for now the bulk of the filters and extensions available are for MSIE only.

The available List settings include Page Break, part of the CSS-2 specification and not yet supported by the current crop of browsers. In fact, the Paged Media category is very extensive and goes way beyond just page breaks. You can actually set the paper size and many other attributes heretofor reserved for desktop publishing programs.
We do, in fact, use the Cursor attribute to set our cursor to a default pointer as discussed in the CSS Overview section. This is not supported by Netscape 4 but does provide a nice cosmetic touch to our pages in MSIE and NN6.
Of course, Filters are only supported by MSIE. Netscape 6 does have an Opacity property... but it's a bit tricky to set it up. Feel free to discuss this and other over-the-edge issues on the PVIIWEBDEV Newsgroup.